Privacy Implications of Windows 10 Telemetry, Part 2: Recording Traffic of the Virtual Machine
In this part of the guide, we will tune up ZFS filesystem, prepare the hypervisor, create virtual disk for Windows 10, and create Windows 10 VM control scripts.
Then we will install Windows 10 into the virtual machine and leave Windows 10 virtual machine for prolonged execution with traffic recording enabled.
Tuning ZFS filesystem
This guide assumes that FreeBSD server has a ZFS pool named tank with at least 256 Gb of free space. More is better. If you need comfortable performance in Windows 10, then please make sure ZFS pool is created on SSD storage devices, or at least has SSD storage device attached in L2ARC mode.
The following ZFS tuning options were applied in our configuration. They are not mandatory, but greatly aid in stability and performance.
Changes in /boot/loader.conf:
zfs_load="YES"
vfs.zfs.arc_max="4096M"
vfs.zfs.arc_min="4096M"
Tuning ZFS pool:
# zfs set checksum=fletcher4 tank
# zfs set dedup=off tank
# zfs set atime=off tank
# zfs set sync=disabled tank
Preparing the hypervisor
bhyve hypervisor requires virtual UEFI firmware to support Windows 10 guest VM. To install and verify it, you need to run the following commands from the shell:
# pkg install uefi-edk2-bhyve
# ls -l /usr/local/share/uefi-firmware/BHYVE_UEFI.fd
Also let’s make sure bhyve vmm kernel module is loaded by FreeBSD loader along with kernel on each system bootup. To do this, add the following line to /boot/loader.conf:
vmm_load="YES"
Then run the following command to avoid rebooting the server:
# kldload vmm
Creating virtual disk for Windows 10
Windows 10 virtual disk will be stored inside ZFS volume (zvol) vhdd_win10. To create it and verify the result, run the following commands from shell:
# zfs create -V 48gb tank/vhdd_win10
# zfs list -t all
# ls -l /dev/zvol/tank/vhdd_win10
Windows 10 VM installation script
Create a home directory for Windows 10 VM, such as /opt/win10_vm:
# mkdir -p /opt/win10_vmUpload setup_x64.iso (Windows 10 setup ISO file) to /opt/win10_vm via WinSCP or using any other way.
Installation script /opt/win10_vm/install.sh should have the following contents:
#!/usr/local/bin/bash
export PATH=/sbin:/bin:/usr/sbin:/usr/bin:/usr/local/sbin:/usr/local/bin
cd /opt/win10_vm
if [ -e /dev/vmm/win10 ]; then
  bhyvectl --vm=win10 --destroy
fi
bhyve -c 1                                                               \
      -s 0,hostbridge                                                    \
      -s 3,ahci-hd,/dev/zvol/tank/vhdd_win10,sectorsize=512/4096         \
      -s 4,ahci-cd,/opt/win10_vm/setup_x64.iso                           \
      -s 5,xhci,tablet                                                   \
      -s 29,fbuf,tcp=0.0.0.0:5900,w=1024,h=768,wait                      \
      -s 31,lpc -l bootrom,/usr/local/share/uefi-firmware/BHYVE_UEFI.fd  \
      -m 4G -H -w -S win10
BHYVE_STATUS=$?
CURRENT_TIME=$(date)
case $BHYVE_STATUS in
  0) echo "$CURRENT_TIME: VM rebooted"
     ;;
  1) echo "$CURRENT_TIME: VM powered off"
     ;;
  2) echo "$CURRENT_TIME: VM halted"
     ;;
  3) echo "$CURRENT_TIME: VM triple fault"
     ;;
  *) echo "$CURRENT_TIME: VM status unknown, exit code $BHYVE_STATUS"
     ;;
esac
Windows 10 virtual machine during installation and during normal operation can be managed in remote-desktop mode via VNC protocol (bhyve hypervisor acts as a VNC server), for example using TigerVNC client software.
Please note that you need to specify IP address of FreeBSD server, not IP address of Windows 10 (i.e. 172.21.93.1, not 172.21.97.x).
We may need to run this script twice or thrice before Windows 10 installation is finished:
# chmod +x /opt/win10_vm/install.sh
# /opt/win10_vm/install.sh
[...]: VM rebooted
# /opt/win10_vm/install.sh
[...]: VM rebooted
We didn’t allow Windows 10 VM network access yet, and didn’t enable traffic recording yet, because Windows 10 without virtio-net drivers won’t be able to access network anyway.
Windows 10 VM run script
Before running this script, virtio-win drivers should be downloaded from this link and uploaded to /opt/win10_vm as virtio-win.iso.
VM control script /opt/win10_vm/run.sh should have the following contents:
#!/usr/local/bin/bash
export PATH=/sbin:/bin:/usr/sbin:/usr/bin:/usr/local/sbin:/usr/local/bin
killall tcpdump
if [ -f /opt/win10_vm/traffic.pcap ]; then
  PCAP_ID=$(ls -1 /opt/win10_vm/traffic.pcap.* | wc -l)
  PCAP_ID=$(( $PCAP_ID + 1 ))
  mv /opt/win10_vm/traffic.pcap /opt/win10_vm/traffic.pcap.$PCAP_ID
fi
tcpdump -i tap0 ip -w /opt/win10_vm/traffic.pcap &
ifconfig tap0 inet 172.21.97.1/24 up
/usr/local/etc/rc.d/dnsmasq restart
while true; do
  cd /opt/win10_vm
  if [ -e /dev/vmm/win10 ]; then
    bhyvectl --vm=win10 --destroy
  fi
  bhyve -c 1                                                               \
        -s 0,hostbridge                                                    \
        -s 3,ahci-hd,/dev/zvol/tank/vhdd_win10,sectorsize=512/4096         \
        -s 4,ahci-cd,/opt/win10_vm/virtio-win.iso                          \
        -s 5,xhci,tablet                                                   \
        -s 10,virtio-net,tap0                                              \
        -s 29,fbuf,tcp=0.0.0.0:5900,w=1024,h=768                           \
        -s 31,lpc -l bootrom,/usr/local/share/uefi-firmware/BHYVE_UEFI.fd  \
        -m 4G -H -w -S win10
  BHYVE_STATUS=$?
  CURRENT_TIME=$(date)
  case $BHYVE_STATUS in
    0) echo "$CURRENT_TIME: VM rebooted"
       ;;
    1) echo "$CURRENT_TIME: VM powered off"
       ;;
    2) echo "$CURRENT_TIME: VM halted"
       ;;
    3) echo "$CURRENT_TIME: VM triple fault"
       ;;
    *) echo "$CURRENT_TIME: VM status unknown, exit code $BHYVE_STATUS"
       ;;
  esac
  sleep 10
  ifconfig tap0 inet 172.21.97.1/24 up
  /usr/local/etc/rc.d/dnsmasq restart
done
Few comments about this script:
- Windows 10 reboots frequently after installing updates, hence the loop.
- Each time this script is cancelled by Ctrl+C, a new traffic dump file will be created.
waitflag is no longer specified infbufoption, so virtual machine will boot without waiting for incoming VNC connection.
It should be run from tmux session, to allow SSH client disconnection without killing bhyve:
# chmod +x /opt/win10_vm/install.sh
# /opt/win10_vm/install.sh
Bingo
Windows 10 virtual machine is up and running, and telemetry traffic is being recorded to pcap files /opt/win10_vm/traffic.pcap.1, /opt/win10_vm/traffic.pcap.2 and so on.
These files can be analyzed later with variety of tools, such as Wireshark, tcpdump etc.
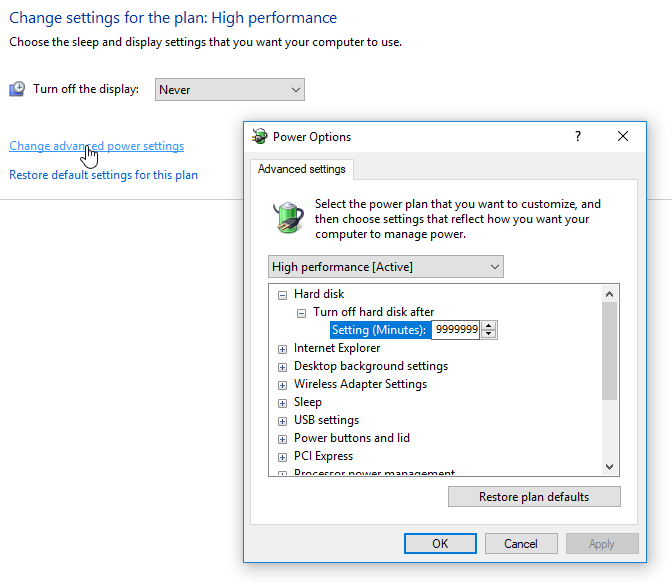
Power Settings in Windows 10 should be configured in such way that Windows never goes to sleep, and never powers down the display and hard disk:

Now let’s leave it alone and wait enough time to collect meaningful amount of data.